When you want to dive into directing a video – A Shotlist is one way to help you organize and plan your project by:
- Breaking your script into clear, filmable shots
- Organizing ideas into a structured shotlist
- Planning an efficient and purposeful filming process
- Strengthening your storytelling through intentional visuals
Have you ever wondered how directors create clear, engaging videos or commercials?
This is one of the tools they use — and now you can too!
Let’s Start!
Now that you’ve completed the Key Video Elements lesson, it’s time to move into planning.
Creating a shotlist is your next step.
Step 1: Get Your Template Ready
You can:
- Fill in all the descriptions first, then complete the rest
or
- Fill in each row as you go
There is no single “right way”—choose what works best for you.
Step 2: Break Your Script into Shots
Go into the Description column and start dividing your script.
Key Rule:
Every time the shot changes → create a new row.
Example
Script line:
“Amy typed on her computer while looking out the window.”
Becomes:
- Shot of hands typing on the computer
- Shot of her face looking out the window while typing
Repeat this process for your entire script.
It may feel overwhelming at first, but this step is what transforms ideas into a clear, visual plan.
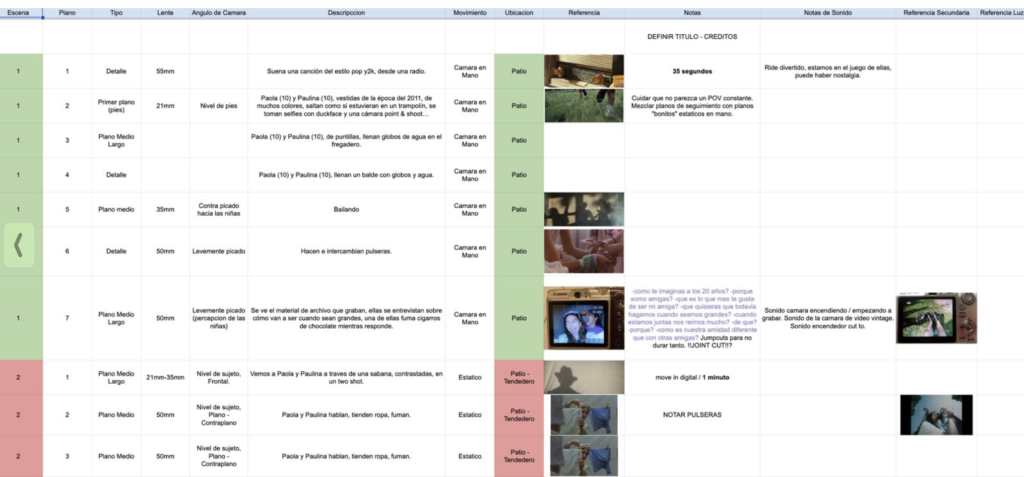
Step 3: Understand the Columns
Scene
- The scene number changes when:
- The location changes
- OR the narrative shifts
Shot
- Number each shot within the scene
- Helps with communication during filming
Example:
“Scene 4, Shot 3”
Shot Type
Defines how much of your subject is visible.
Examples include:
- Wide shot
- Medium shot
- Close-up
Use the Shot Type Cheat Sheet in your template for reference.
Camera Angle
Describes the camera’s position relative to the subject.
Examples:
- Eye level
- Low angle
- High angle
- Tilted
This affects how your audience feels about the scene.
Reference
- Add an image or sketch of your idea
- This is optional—but helpful
Location
- Where the shot will take place
- Helps you organize filming efficiently
Goal:
Film everything in one location at the same time when possible.
Example:
Avoid going:
House → Beach → House → Park → Beach
Instead:
Group shots by location.
Notes
- Add anything extra:
- Dialogue
- Reminders
- Props needed
Step 4: Refine Your Plan
As you build your shotlist:
- Remove unnecessary shots or scenes
- Simplify where possible
- Focus on what truly supports your story
Reminder: Less is more.
Step 5: Final Check
Before moving on, ask yourself:
- Does my story flow clearly from beginning to end?
- Do my shots support my message?
- Can I film this efficiently by location?
- Is anything unnecessary or repetitive?
To Do:
- Complete your shotlist using the template
- Ensure every part of your script is broken into shots
- Organize your shots by scene and location
Last Thought
This process might feel detailed, but it’s what separates a basic video from a strong, intentional one.
A clear plan allows your ideas to come to life in an organized and impactful way—and sets you up for success when filming begins.